The only plastic we need for travel.
Easy Schengen Visa Application Guide for Filipinos Planning to Visit Iceland

I don’t know what it is about Iceland that’s drawing me to it. Maybe it’s the possibility of seeing the multicoloured aurora borealis at least once in this lifetime. Perhaps it’s the opportunity to swim in a geothermal pool and marvel at glaciers all in one day. It could also be the chance to explore the frozen landscapes shown in the popular HBO TV series, The Game of Thrones. Or what if it’s simply all of the above?
Whatever the reason(s), Iceland is on my list this year and I’m determined to make this destination my “trip of the year”!
Also read: Pinoy’s Guide to Surviving Winter in Iceland: 7 Clothing Essentials to Pack
First things first though, as a Filipino citizen, a tourist visa is definitely required. And since the process of getting one can be confusing, I made a guide for interested Filipino travellers.
General Information
Iceland, although not part of the European Union, is a part of the Schengen area, which is comprised of 26 European states (Austria, Belgium, Czech Republic, Denmark, Estonia, Finland, France, Germany, Greece, Hungary, Iceland, Italy, Latvia, Liechtenstein, Lithuania, Luxembourg, Malta, Netherlands, Norway, Poland, Portugal, Slovakia, Slovenia, Spain, Sweden and Switzerland). When it comes to international travel, the Schengen area works like a single country. Thus, passport and border controls are quite lax at their mutual borders, making it easy for travellers to transit from one country to another within the region.
For citizens of certain countries (like the Philippines), who are required to get a visa to enter the Schengen zone, only one visa is needed – the Schengen visa.
So where do you apply? Which embassy or consulate?
If you’re visiting multiple Schengen countries in one trip, this rule applies:
a. If the number of days of your stay per country is unequal, you must apply for a visa at the diplomatic mission of the country of your longest stay; or
b. If the number of days of your stay per country is equal, you must apply for a visa at the diplomatic mission of the country of your first port of entry.
Also, if you will be staying inside the Schengen region during the entire duration of your trip, apply for a single entry visa. Requesting for a multiple entry visa without an itinerary to back it up won’t be easy, especially for first-timers, since you will have to present a strong case for your need to travel frequently to the Schengen zone. You should only apply for a multiple entry visa if you will be going in and out of the Schengen region whilst on your trip.
Visitor’s Visa
Save for their embassies in Beijing and Moscow, Icelandic embassies and consulates do not usually issue visas. But Philippine citizens or legal residents planning to visit Iceland for not more than 90 days over a period of 6 months can lodge their Schengen visitor’s visa applications with the Royal Norwegian Embassy-Manila, which also handles visitor’s visa applications on behalf of Norway (obviously), Estonia, Finland and Sweden. It is highly encouraged to apply for a visa as early as 3 months to at least 15 days before your planned departure because the embassy might ask you to come in for an interview or submit additional documents. The last thing you want is to stress yourself out by cutting it too close.
In my case, the plan was to visit multiple Schengen countries but to have Iceland as my main destination. The others were merely short stopovers. In addition, I structured my itinerary in such a way that I wouldn’t have to go in and out of the Schengen region. Thus, I ended up applying for a single entry visitor’s visa at the Royal Norwegian Embassy-Manila.
Also read: My Euro Trip: Backpacking 5 Countries in 8 Days with ₱108k (All-In) Budget
Steps
1. Gather the required documents
The required documents differ per country (Estonia, Finland, Iceland, Norway or Sweden) and purpose (visiting relatives/friends, going on a business trip or joining a tour/cruise) so click here to find out what you need to submit. All documents must be in English, Norwegian or Swedish so you have to have your documents translated if they’re in any other language. Please note that the embassy prefers to receive documents that are unstapled and in A4 paper.
In case you’re curious, these were the mandatory documents I submitted:
a. Checklist and Questionnaire: completely filled out and signed
b. Cover Letter: downloaded and printed from the Application Portal; signed; contains the receipt number to serve as proof of payment for the application
c. Visa Application Form: downloaded and printed from the Application Portal; completely filled out and signed
d. Photo: passport-sized; coloured with plain white background; not older than 6 months; glued to the upper right corner of the Cover Letter
e. Current Passport: original; with 2 unused pages; valid for at least 3 months after intended departure from the Schengen area
f. Current Passport: photocopy; includes the biopage and used pages (visas and stamps)
g. Bank Certificates: original
h. Hotel Bookings/Accommodations: photocopy
i. Full Itinerary: photocopy
j. Roundtrip Airline Ticket Reservations: photocopy
k. Travel Medical Insurance: photocopy; valid in all Schengen states; valid for entire duration of stay; minimum coverage of at least EUR 30,000/USD 50,000/PHP 2.5M
As for the supporting documents, these were the ones I submitted:
a. Old Passport: photocopy; past 3 years; includes the biopage and used pages (visas and stamps)
b. Employment Certificate: stating current position, length of service, salary and duration of approved leave of absence
c. Company ID: photocopy
d. Payslips: photocopy; last 3 months
e. Bank Statements: original; last 3 months
2. Fill up the online visa application form

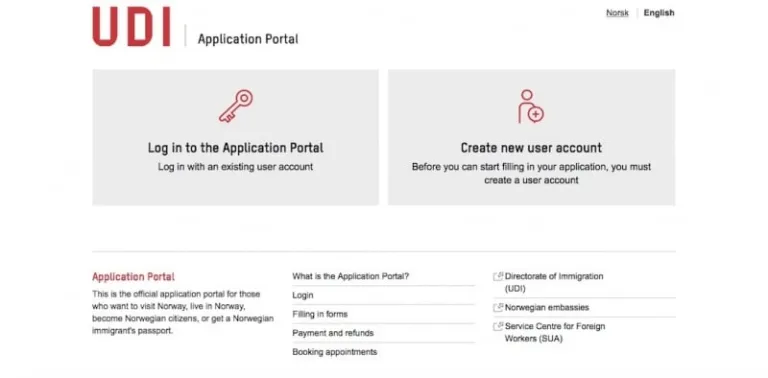
The online application form can be lodged via the Application Portal. If it’s your first time applying, you will have to create a user account. Click here to register. You should receive an email confirmation after registration, asking you to activate your account. After activation, you can start filling up the form. You will be asked to provide basic information about your identity, contact details, work/education, family, travel history, travel plans and travel expenses. If you can’t finish accomplishing the form in one sitting, you can always come back and finish it later as long as you “Save” – and not yet “Submit” – what you’ve done.
If you’re applying and travelling as a group of more than 2 persons, there is an option to register as a group. Under “Visa Group”, you can register up to 16 applications at a time.
3. Pay the visa fee and schedule an appointment
Both steps are done via the Application Portal as well. There is a tiered fee structure for the visa fee (applies to both single and multiple entry visas):
EUR 60 – Age 12 and above
EUR 35 – Age 6 and below age 12
FREE – Below age 6
Some individuals/groups are exempted from paying the visa fee. But the way this works is these applicants will still have to pay online but can ask for a refund when they show up for their appointment at the visa application centre. To find out if you’re exempted, click here.
The documents for the visa application are received by the embassy’s external service provider, VFS Global, and not by the embassy directly. VFS Global has 2 offices – one in Manila and another one in Cebu – so you can choose which one will be the most convenient for you. If you’re submitting your documents to VFS Global’s Manila office, you need to book an appointment. In Cebu, the office accepts walk-in applicants as long as they already have an account in the Application Portal.
4. Hand in your documents
Arrive in time for your appointment to avoid any problems/delays. Also, bring cash to pay for VFS Global’s service fee (which is different from the visa fee you paid online). When I applied, the fee was around ₱1,420. I also availed of the courier service because I wanted to have my passport delivered to my office so I had to add ₱370.
At the visa application centre, I just submitted my documents and had my biometric data registered. I wasn’t called for an interview anymore so I was done in about an hour.
Just a reminder, you can’t use your cellphone inside the visa application centre so if you have it with you, don’t take it out of your bag.
5. Wait for the decision
According to the VFS Global staff that I spoke to, normal processing time for applications takes around 15 calendar days. Although, exceptional cases can take as long as 2 months. Luckily, I got my result in just 7 calendar days. I was notified of the embassy’s decision via email and SMS so I knew even before I got my passport back and saw the visa glued to my passport that I’d been granted a visa.
If your application gets rejected, you will receive a written explanation with the reason for denial and can appeal the decision within the timeframe set in the letter you receive.
Hope this helps!
Published at
About Author
Catherine Mirasol
Subscribe our Newsletter
Get our weekly tips and travel news!
Recommended Articles
14 Best Credit Cards for Travel in the Philippines 2019 Visa-Free Destinations for Philippine Passport Holders Where will your passport bring you next?
Our 3-Day Tokyo Trip: Guide, Itinerary & Tips for Filipinos If you only have 3 days to explore Tokyo, here’s a guide for you!
7 Days in Iceland: Itinerary, Tips & Budget Let this inspire you to tick Iceland off your bucket list soon!
8 Tricks to Successfully Grab Cheap Promo Flights in the Philippines PISO fare! Ooops, too late, all seats are sold out! Here’s what you need to do next time.
Latest Articles
SM North-Trinoma Walkway Soon to Be Built, Says DOTr Safer walks ahead!
Pangasinan Town Now Accepts Digital Payments in Markets and Transport No cash? No problem. Alcala, Pangasinan is officially in its digital era.
Pop Mart PH Opens Permanent Flagship Store in SM Megamall Labubu and Hirono have arrived! Check out holiday hours and event recaps here!
Chen of EXO Arcadia Concert Manila 2026: Tickets, Dates, and Perks Ticket info and fan perks
TLC Playpark: Free Christmas Destination in Taguig, Opening Hours, and Commute Guide Learn what to expect and how to get to TLC Playpark in Brgy. Lower Bicutan Taguig via C5 and MRT-3!

