The promise of new flavours beckons from Banawe.
US Visa Renewal For Filipino Tourists: How I Renewed Without Interview!
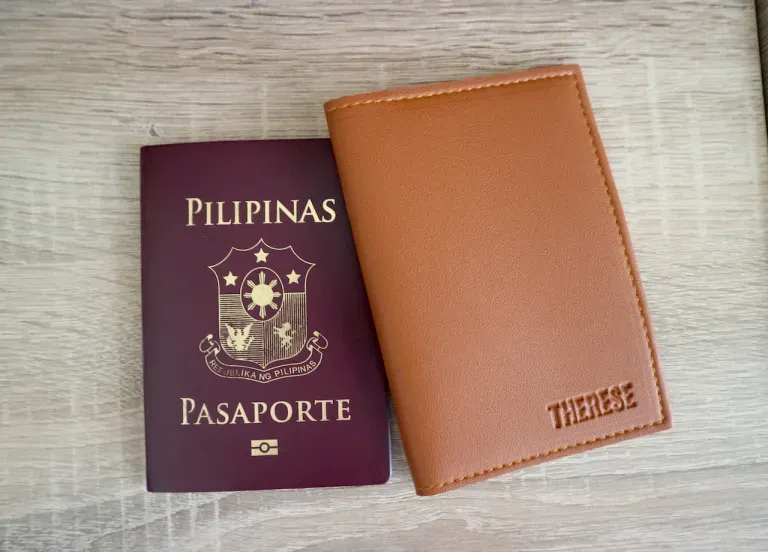
If you’re a Philippine passport holder, a U.S. Visa is one of the hardest, if not the hardest visa application you’ll ever go through. And frankly, we all just dread the risk of our application getting rejected on the spot after collecting the necessary documents and saving up all that money.
Also read: How To Apply For A US Tourist Visa For Philippine Passport Holders
Thankfully, those who already have a previous U.S. Visa don’t necessarily need to go through the same arduous tasks. If you’re lucky like me and already qualify for a U.S. Visa renewal, you only need to fill out online forms, with a possibility of getting exempted from an interview, AKA an interview waiver.
In my case, my renewal was thankfully approved with no appearance needed. I received my passport back with a new U.S. Visa within a few days of sending the printed and necessary documents to the U.S. Embassy! If you already have a soon-to-be expired U.S. Visa, and simply wish to renew as I did, here’s what you need to know.
Note: I’m no expert and I can’t promise that your U.S. Visa renewal experience will be the same as mine. I’m simply sharing my own experience in case it helps you. Remember to do your own research to ensure your visa renewal!
There’s a criterion for interview waiver applicants…

Sadly, not all Philippine passport holders applying for U.S. Visa renewal are eligible for the interview waiver. In fact, meeting this criterion doesn’t even ensure that your interview waiver will be approved, let alone promise that your visa is renewed. This is because specific cases need further probing, but more on this later. For now, meeting the following qualifications for interview exemptions is a good start, according to the U.S. Travel Docs website:
- You are a Filipino citizen
- You have a previous B1/B2 visa that you want to renew
- This visa was issued after 1 July 2007
- Your prior visa was also valid for at least five years
- It is still valid or has expired within the last 12 months
- Your prior visa does not say “Clearance Received” or “Travel with Employer”
- You are in possession of your passport with your latest B1/B2 visa
- Your name, date of birth, and gender, on your most recent B1/B2 visa, do not need to be changed or corrected
- This visa was issued on or after your 14th birthday
- Your last application for a B1/B2 U.S. Visa was approved
If all these conditions apply to you, then you have a chance to renew with no appearance and interview! Proceed to the next three steps!
Step 1: Pay the U.S. Visa application fee
Before anything else, you need to pay for your application! Since my family applied for a Class B or Tourist Visa, we needed to pay ₱8,460 each. See the fees for different types of U.S. visas here.
You need to make a deposit at any branch of the Bank of the Philippine Islands (BPI) in cash, or you can also pay online if you have an account with BPI or BancNet.
Paying in cash at BPI
Now, before you go to the bank, you have to print your U.S. Visa application deposit slip to show the bank upon payment. Your deposit slip should reflect the fee of the type of visa you’re applying for. Go to the US Travel Docs website, and click the deposit slip link that matches your visa application fee in dollars. As I stated above, a US Tourist Visa application is equivalent to ₱8,460. Hence, click Deposit Slip – $160 MRV.
Refer to this image to see what the selection on their website looks like:

Every time you click the deposit slip link, the receipt number changes. This just means that you will get a unique deposit slip for each person when applying as a family. So, don’t bother printing multiple copies of the same deposit slip that has the same receipt number, because you all ought to have different slips with varying receipt numbers when you pay for each person at the bank.
The deposit slips also have expiry dates. If you happen to exceed the expiry date before payment, just click the link again to generate a new deposit slip for printing.
Once you’ve finished paying for your U.S. Visa renewal application fee at the bank, keep your receipt. You’ll need the Merchant Reference Number later on for the interview waiver form, and the receipt number if ever you still need to schedule an appointment with the U.S. Embassy.
Paying online
If you want to pay online, go to the U.S. Travel Docs website or click here. Under “Online Payment”, you can select either “BPI” or “BancNet”, assuming you have an account with either.
Refer to this image to see what the selection on their website looks like:

Our family paid through BPI. To make things faster, only one of us made the deposit for everyone (that would be my sister). You should not pay in bulk when paying for a group or family, as each applicant should be issued a UID or receipt number. Pay for each person one at a time.
The BPI link gave a different reference number every time my sister clicked it. If you’re the one paying for everyone in your group, get a reference number for each person you’re paying for, and enrol each reference number as a bill on your BPI account.
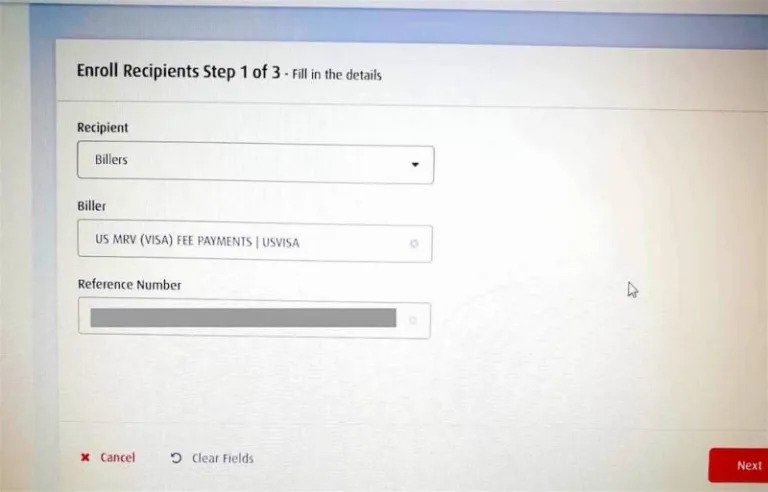
Once you’ve enrolled each reference number, you can select and pay it like a normal bill. Remember, you have to pay one at a time!
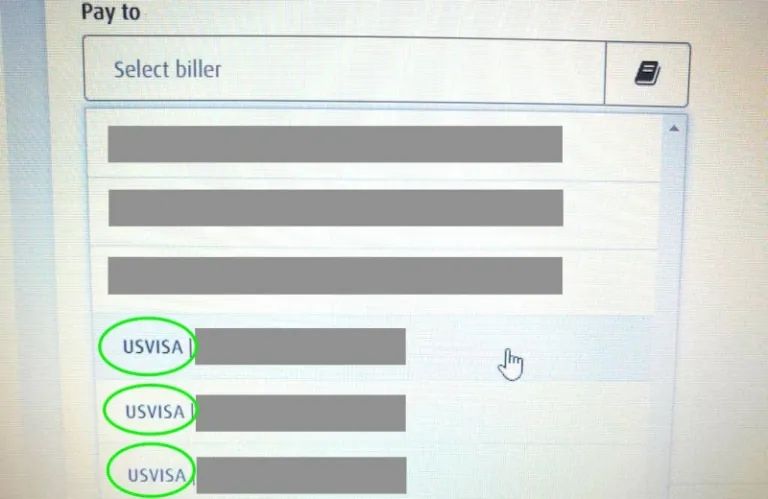
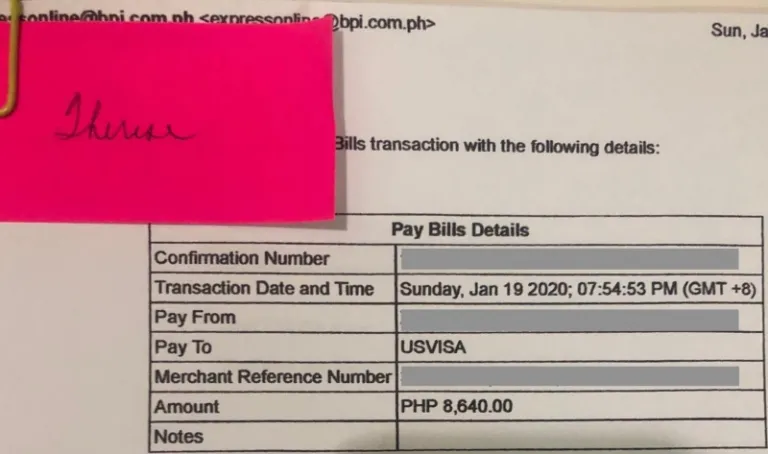
When you’re done paying, you should get an email of the receipt for each reference number or person you paid for. Again, keep and print your receipt because it has the necessary information you need in getting an interview waiver or scheduling an appointment.
This is what the fee receipt looks like:
Step 2: Fill out your DS-160 form
This is the most tedious step of all, and one that might take you more than one sitting to fill out. In completing the Nonimmigrant Visa Electronic Application form (DS-160), I advise you to be extra careful and double-check details with your family if you’re applying as one. The smallest differences might break your application. Click here to begin filling up the form.
Tip: Before you begin, it’s best to already have digital and printed 2×2 U.S. Visa photos on hand. You’ll be needing them for your application.
Starting your U.S. Visa application
On the right side, you’ll be asked the location of where you’re applying for your visa. Scroll down to “Philippines, Manila,”. Once you click that, the page will immediately reload with a different code you have to enter. Input the code and click “Start an application”. See image below for reference.
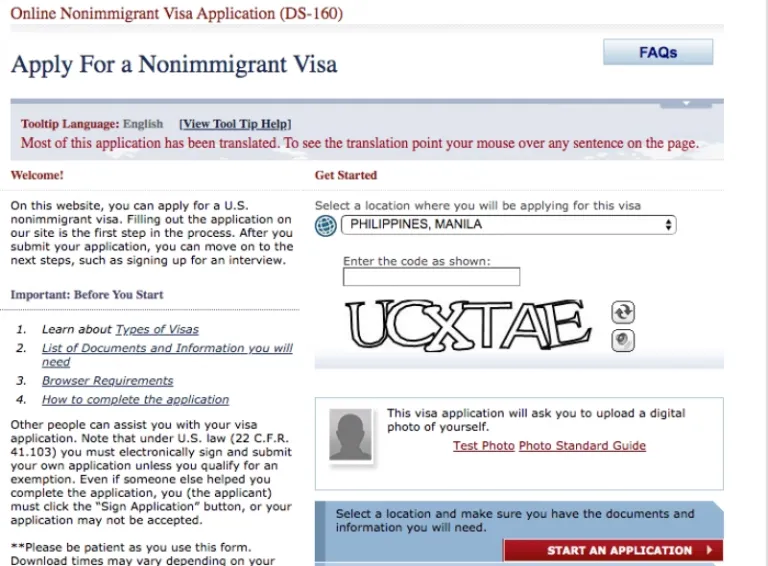
You will then be given your Application ID. Along with that, the site will ask you for your security question and answer. These will serve as your login details, so don’t forget them! Like I said previously, finishing this form could take you more than one sitting. Hence, you’ll be forced to sign in and out for several days as you take your time in answering the form.
This is how your Application ID will appear on the website:

Don’t worry, you can save your progress as you fill out the form (there’s a “save” button below each page). You can even edit the information you’ve already filled out every time you log back in! The important thing is to remember your application ID and security Q&A so that you can actually return to your application. Note that you have to finish answering the form within 30 days.
Filling out the application
The form has 10 different sections: Personal, Travel, Travel Companions, Previous U.S. Travel, Address and Phone, Passport, U.S. Contact, Family, Work/ Education/ Training, Security and Background.
Completing this form becomes really time-consuming, especially if you’re applying as a group or family. There’s a tendency to go back and forth to double-check if your answers are all aligned. But if you’re applying solo, then filling out the DS-160 shouldn’t take you that long, as long as you have all the details with you.
Details you have to prepare to save you time:
Under Personal
This first part will just ask for your basic information such as name, date of birth, country, emails, etc. But it will also ask for all your active social media accounts, from Facebook, Twitter, Youtube, Instagram, Tumblr, to even your LinkedIn! You’ll need to give your handles/user names if you want to answer this part thoroughly.
Under Travel
You will be asked your intended date of arrival, length of stay, and the address where you will stay in the U.S. If your family’s renewing early without any specific plans yet, it’s best to agree on your answers, even if your plans aren’t final. Discussing this before answering the form will save you a lot of time.
Under Previous U.S. Travel
This is where it gets nitty-gritty. The site will tell you to state the date of arrival and length of stay of your five previous U.S. travels. Hopefully, you still remember, or at least your passports still have the stamps to remind you of the dates. Although the form states that it’s okay to give an estimate if you truly can’t recall, do your best to track the original dates to be safe. If you haven’t visited the U.S. at least five times, just place the date and length of stay of your previous visits all the same.
While you’re answering, be sure to have your most recent U.S. Visa beside you because you have to place its details on the form as well. Aside from that, you’ll be asked if you’ve ever been ten-printed. I had a hard time recalling if I had actually done this, so I just stuck with the answer the rest of my family gave, which was a resounding “yes”. Can’t say I was a hundred percent sure, though!
Under U.S. Contact
If you have a friend in the U.S., maybe you can ask him or her if it’s alright to place his or her details on the DS-160 for the sake of your U.S. Visa renewal. I don’t believe this is a requirement, but the form does ask if you can give a contact that you have in the U.S. If your friend agrees, you have to state your relationship with that person, and his or her address and phone number.
All the other details should be easy enough to answer. When applying as a family, just remember to have not only your own current passport and your most recent U.S. Visa with you as you complete the form, but also copies of your family’s. That way, you don’t have to waste time asking for each other’s particulars while filling out other details. Remember, you can always save your progress by clicking “Save” at the bottom of each page if you want to continue answering on another day!
Uploading your photo
Once you’re done answering the last section, which is Security and Background that’s mostly just “yes or no”, you’ll be asked to upload a 2×2 U.S. Visa photo before completing the form. Avoid submitting scans. Just upload the raw digital copy of your visa photo, which you can ask for when you take your picture at a studio.
The site will give you guidelines on the standard quality they need for the photo. If your uploaded photo passes, then you’ve finished filling up your DS-160 (finally!).
Reviewing your U.S. Visa application
Thought you were finished? Nope, not yet! After your photo submission, you’ll be led to the Review section where you’ll get your last chance to edit and confirm all the information you’ve placed on your DS-160 form. The Review section will look like the photo below.
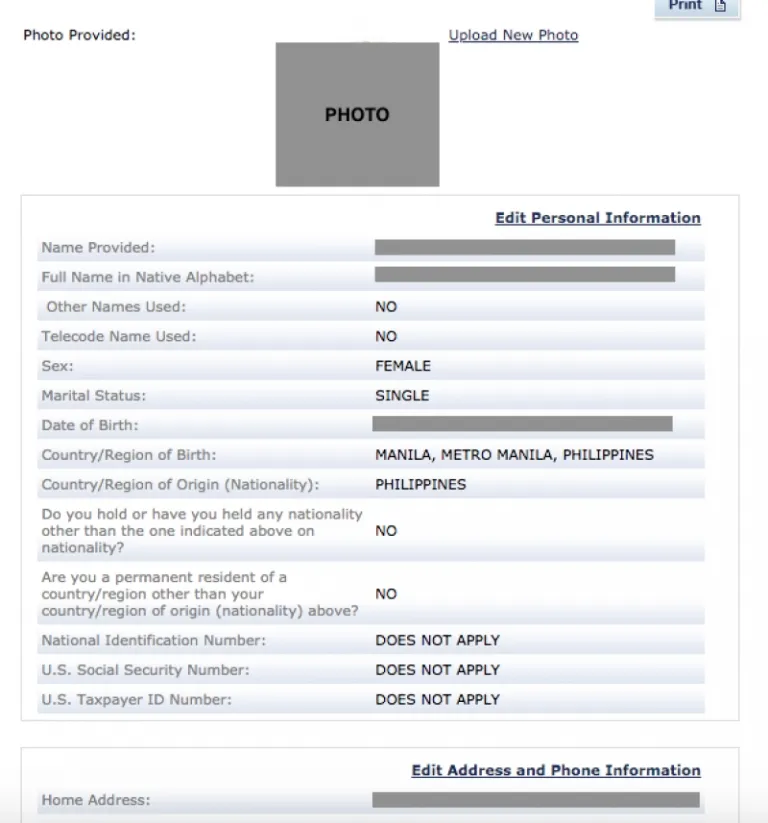
As you can see on the upper right corners, there are still options to edit each section. Feel free to revise any mistakes you made and to double-check everything for the last time. Though this just looks like another layer to make you paranoid about your own answers (I know it was for me!), at least the website gives you enough opportunities for your visa to be renewed with no appearance!
The Review section continues to several more pages until you reach the page where it says “Sign and Submit” at the bottom right. If you’re sure that all your answers are accurate and honest, click it. You’ll then be asked to “sign” by entering your passport number. Once you’ve done this, you’ll finally get your Confirmation Page! Email it to yourself, save, and print it. It’ll look like the photo below.

Note: You’ll also be given a copy of your answered application form, but you don’t need to print or send a copy of this to the U.S. Embassy once you’ve received your Confirmation Page. You may keep a copy for your personal records. After emailing your Confirmation Page to yourself, you will no longer be able to edit your application form.
Step 3: Register an account on the cgifederal website
This is the last leg of your U.S. Visa renewal application (hopefully)! Before you create an account at the cgifederal website, know that only one person can answer this form if you’re applying as a family and all of you qualify for an interview waiver.
Once you’re logged in, there will be a panel on the left side of the page. Click the first option that says “New Application/ Schedule an Appointment”. The website will just clarify basic details and ask what type of visa you’re applying for, but the most important thing is that you have the following details: merchant reference number (from your application fee receipt), DS-160 confirmation number, and passport information. Hence, if you’re the one completing this form for your family, make sure to ask all these details from each family member. This is what adding an applicant (or family member) looks like on the website.

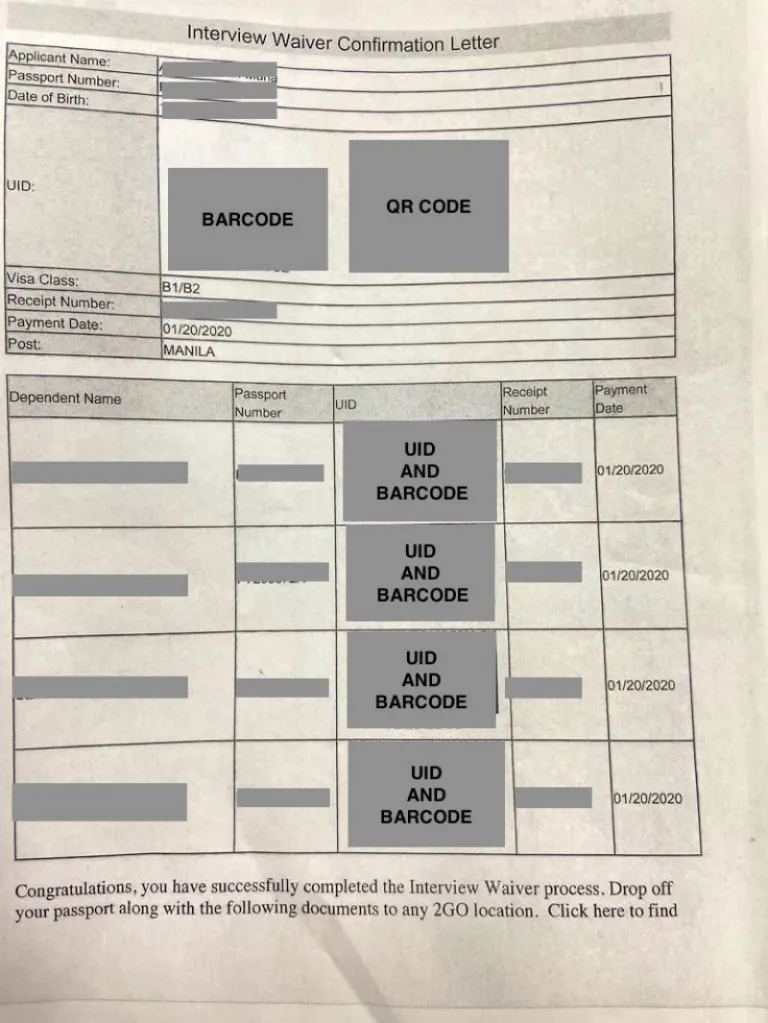
Once you’ve submitted all your details and that of your family’s, the Interview Waiver Confirmation Letter will appear on your screen (assuming all of you qualify!). There will only be one letter for your whole family, but you’ll need to produce/print as many copies as the number of your family members when you send your documents to the U.S. Embassy.
Step 4: Drop off your documents at any 2GO outlet
Now that you’ve completed all the forms for your U.S. Visa renewal, you can now send your documents via 2GO.
The Interview Waiver Confirmation Letter will also instruct you on what documents should be included. Usually, these are the following for each applicant:
- A copy of the Interview Confirmation Letter (Remember, each family member should have a copy attached to their application.)
- Valid passport
- Old passport with most recent B1/B2 visa
- Two 2×2 inch photos on glossy paper, coloured with white background. This should have been taken within the last six months, with neutral facial expression, and eyebrows and ears exposed
- DS-160 Confirmation Page
Drop all these requirements at any 2GO outlet to send to the U.S. Embassy at Roxas Boulevard, Manila.
Step 5: Wait for your passports to be delivered to your address
Now, the waiting game begins! The good news is, it won’t take that long for your passports to be returned to you. It usually takes the U.S. Embassy a maximum of one week to return them. In our case, we dropped off our documents at a 2GO outlet on a Saturday (1 Feb), and got them back the following Wednesday (5 Feb). And yes, our passports came back with our new U.S. Visas — no appearance or interview needed!

When I checked the date of issuance, it said 4 Feb 2020. Which means our visas were approved within only two working days! It was a relief, to say the least. All that time spent scrutinising the DS-160 form to give the most accurate and honest answers definitely paid off.
Also read: Amazing Visa Application Hacks You Might Not Know About
Important reminders…
Reiterating what I said at the beginning of this article, qualifying for an interview waiver doesn’t guarantee that the U.S. Embassy will actually grant you a no-appearance U.S. Visa renewal. This is simply an opportunity where you can try your luck if you meet the criterion for their interview waiver. If your visa renewal wasn’t granted with the interview waiver, your passport will be returned to you and the U.S. Embassy will ask you to schedule an interview instead.
Filipinos who qualify for an interview waiver can be denied the waiver for specific reasons. For instance, if you still have a valid U.S. Student Visa even after completing your degree in America (a student visa becomes null and void within 60 days after the program end date, even if the student visa is yet to expire), the U.S. Embassy in Manila most likely has to confirm your completion. Hence, that person with a student visa has to make an appearance to clarify this with the embassy, and so that they’ll know if they can issue the applicant a new Tourist Visa.
Also read: How I Spent 4 Days In New York City: Itinerary And Tips
There are many more situations that can call for an appearance at the U.S. Embassy, but there’s no harm in applying for their interview waiver if you think you meet the basic qualifications (see the first subhead)! After all, you get to complete all the forms in the comfort of your home. The earlier you renew, the less stressed and rushed you’ll feel in completing the application. Go for it, and let us know how your U.S. Visa renewal turns out!
Published at
About Author
Therese Sta. Maria
Subscribe our Newsletter
Get our weekly tips and travel news!
Recommended Articles
10 Best Banawe Restaurants for a Mouthwatering Food Trip in QC 10 Commandments for Responsible Travel Flexing Spread the good word!
10 Long Weekends in the Philippines in 2023 Book those flights ASAP.
10 Tips for Planning Out-of-Town Trips During Typhoon Season Stay safe and travel well during the rainy season.
12 Most Colourful Natural Attractions Around The World! It’s time to cross over the rainbow!
Latest Articles
10 Airbnb Rentals In Boracay Perfect For a Quick Family Vacation Check out these cosy, fun, and convenient Airbnb stays!
Ilocos Norte Travel Guide: Where and How to Go Discover the best of Ilocos Norte!
Where to Find the Best Korean-Themed Cafes in the Philippines Here are the trendiest Korean cafés in the Philippines!
Photography Etiquette in Japan: What Travellers Must Know Essential tips for respectful photography in Japan.
Monkey Bay Thailand: What Filipino Travellers Should Know Before Travelling One year after the scare

