Los Angeles is more than Hollywood stars. From hikes with killer views to beaches straight out of a rom-com, here are 10 must-do LA experiences for Filipino travellers or any wanderers in general!
How to Apply for a South Korea Tourist Visa in Cebu

Contributed by Deetoxify
Everybody must have read something like this by now but I’m sharing my experience anyhow. If you can relate to my situation, then read on.
Just so you don’t have to scroll down so much and end up saying “I wasted my time reading this article”, here’s a quick peek at my situation.
My visa application requirements are not entirely complete. Yes, I think you know what I mean. I don’t have a copy of my Income Tax Return (ITR) and I’m telling you how and why.
“Applying for a visa can be nerve-wracking” — I bet you’ve read this everywhere! And I agree 100% especially when you don’t have all the papers required by the embassy or the consulate in my case. Plus, you’re travelling alone.
I’ve read a lot of blogs before I decided to push through with this trip. I love reading other blogs because I gain a lot of information. But sometimes, too much reading stirs anxiety.
Many of my friends say it will be easier for me since I was issued an Australian visa. But having other visas from other countries is not an assurance for the approval of your next visa application. Don’t ask me why. Different countries have different laws and regulations. So whatever they decide on, if they permit or deny you to enter their land is up to their discretion.
So here’s how I applied for my Korean Tourist Visa in Cebu. This only applies to Philippine passport holders. For other types of applications, please visit the Korean Embassy’s website or contact the Consulate’s office.
Also read: Easiest to Hardest Visa Applications According to Filipino Travellers
Step 1: Read [instructions] carefully
What happened was, I already prepared the requirements basing on other blogs that I’ve read and by checking the Korean Embassy’s website. I was ready to submit all my requirements but when I got to the Consulate’s office, I missed out one thing — TIME.
If you haven’t known yet, the office of the Korean Consulate here in Cebu opens from 9am to 4pm daily, except Saturdays and Sundays.
Note: Visa applications will only be catered from 9 to 11 in the morning, while visa releasing will take place in the afternoon between 2 and 4. All along, I thought they processed visas all day. Now you know!
Since I was already there, I got a copy of the list of requirements to double check if what I already had was good to go.
Step 2: Prepare the necessary requirements
Here’s the list of requirements based on the list that I got from the Korean Consulate’s office in Cebu:
- Accomplished application form — Fill out this form completely and correctly. Provide the details which only apply to you. Put ‘N/A’ in items that are not applicable. Write in block letters either in English or Korean. You can either submit a type-written form or a handwritten form.
- One piece of passport sized coloured picture — Paste it to your application form.
- Original passport — It should be valid for more than six months.
- Photocopy of passport bio-page — If you have the newly issued Philippine passport, include the page which has your signature. I met someone who was asked to come back because she wasn’t able to provide the third page.
- Original and photocopy of valid visa/s and arrival stamps to OECD-member countries for the past five years — The Organisation for Economic Co-operation and Development (OECD) is an intergovernmental economic organisation with 36 member countries founded in 1961 to stimulate economic progress and world trade. Korea is part of the OECD but Korean visas will not be counted as part of the requirements. Other countries such as Australia, Japan, the United States and/or other Schengen countries can be included.
- Original Certificate of Employment — This should include your position, date hired, compensation, office address, office landline number and your HR’s e-mail address.
- Original Personal Bank Certificate — This should include your account type, current balance, account opening date and average daily balance (ADB).
- Bank Statement — An original or a certified true copy of bank statements/passbook for the last three months is required to be submitted.
- Photocopy of ITR or Form 2316 — This should be checked and stamped by the Bureau of Internal Revenue (BIR).
- Copy of PRC Card of IBP Card, if applicable.
If personally invited by a Korean national, you are required to include the following:
- Invitation Letter
- Copy of Invitor’s Passport
If invited by a company in Korea, you are required to include the following:
- Invitation Letter
- Copy of Korean Company Business Permit
Here’s what I submitted:
- Accomplished Application Form — Don’t forget to sign and put the application date. I also filled out the ‘Details of Sponsor’ part. Check the additional requirements below.
- One piece of passport size coloured picture
- Original passport
- Photocopy of passport bio-page
- Original and photocopy of valid visa/s and arrival stamps to OECD-member countries for the past five years
- Original Certificate of Employment
- Original Personal Bank Certificate
- Bank Statement signed by a bank officer
Additional requirements:
- Photocopy of ITR of my father
- DTI, Mayor’s Permit/Business Permit of my father’s businesses
- Photocopy of my father’s government IDs
- Photocopy of my PSA Birth Certificate as Proof of Relationship to Sponsor
- My father’s Original Bank Certificate
- My father’s Bank Statement signed by a bank officer
- Notarised Affidavit of Guarantee
- Cover letter of the company explaining why I can’t submit my ITR
- Itinerary with the dates of departure to Korea, arrival in the Philippines, flight and hotel details
Step 3: Submit all your documents
A few months ago, it was announced that Korean Visas will only be processed through accredited travel agencies. I got upset at first because I didn’t want to pay so much since I knew that Korean Visas are gratis/free and I already had my requirements ready. I researched so much about Korea that I felt like there was no need to ask an agency to process my visa.
A few days after the effectivity of the ‘no walk-in’ rule, a friend of mine said she was able to get her visa at the Korean Consulate in Cebu ON HER OWN! I got excited! This means that the circular is only applicable in Luzon. The Korean Consulate in Cebu still accepts walk-in applicants! The only difference is if you apply in Cebu, your visa processing can take up to seven working days. The three-day rule for applicants with OECD visas does not apply here. If you want to make sure, you can always call the Consulate’s office.
Also read: New Korean Visa Application Through Travel Agencies Starting July 2018
I went to the Consulate’s office to submit all my documents. I suggest you go there early at around 8.30am. They already allow applicants to go in and queue. It’s better to be there early because if they request for other additional documents, you can still submit it on the same day.
Follow their security protocol. Your bags will be checked, your phone cameras will be blocked by stickers and you have to log in your details and get a queue number. Wait for your number to be called and proceed to the Visa Window. The Consulate officer will screen and evaluate all your documents. If you pass, you’ll be given a slip. It will indicate the tentative date your passport will be released.
You can check your visa application status here.
Step 4: Pray to God that everything goes well!
Here’s why — I submitted my visa application a few days before my trip to Hong Kong. I needed to get my passport back just in time for my HK trip. This added more thrill to my experience. I was really hoping that all my documents were okay so there’s no need for an extension.
And then… I got an email from the Consulate. Good thing I was able to check my email early that day. The Consulate said I needed to submit another document! I panicked for a bit because it was already 10am and their office closes at 11.30am for lunch break. I decided to call the Consulate’s office. The heavens answered my prayers! They said I can just scan and email the document and there’s no need for me to go to their office. I was able to breathe.
I was just hoping they would not extend the release of my passport.
Step 5: Claim your passport (hopefully with a visa)
I went to the Consulate’s office following the date indicated on the claim slip. I went there at around 2pm. There weren’t many people. I got my passport back in less than an hour.
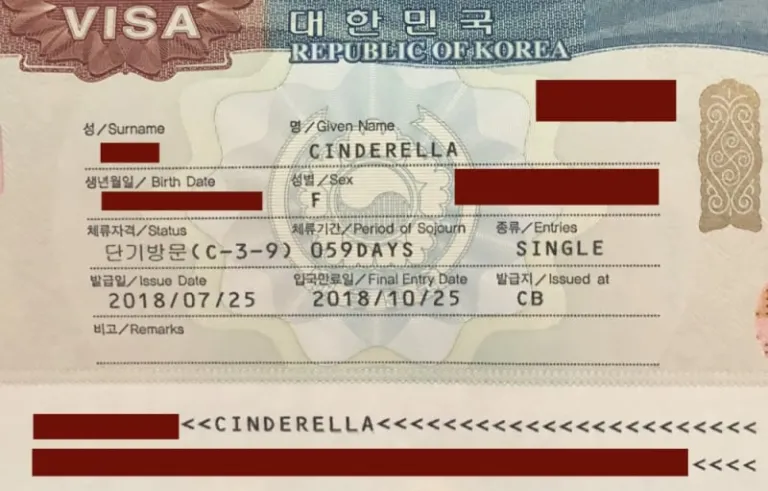
And voila!

Thank you, Jesus!
I went home with a huge smile on my face. One, because they did not extend the release of my passport. Two, because my HK trip was pushing through. Three, I GOT MY VISA!
So that was my visa application experience! I hope this can help you in one way or another. I can’t wait to share with you what happened on my solo trip to Korea!
Here’s a little sneak peek of my #goSeoulo trip!


Feel free to leave comments or message me via e-mail if you have any questions. If you like this article and want to see and know more about my trips and tips, follow me on Instagram, Facebook, and Twitter.
For further details, contact the Consulate of the Republic of Korea in Cebu.
Address: 12/F Chinabank Corporate Center, Cebu Business Park, Cebu City
Contact number: (032) 231-1516
Published at
About Author
Cinderella Ruiz
Subscribe our Newsletter
Get our weekly tips and travel news!
Recommended Articles
10 Best Things to Do in Los Angeles 10-day Christmas and New Year Japan Trip: Complete Travel Itinerary Celebrate Christmas and New Year in Japan with this 10-day holiday vacation itinerary packed with Tokyo lights, Kyoto charm, and Osaka adventures.
10 Strange Singapore Laws You Could Get Fined or Jailed For Chewing gum is contraband, elevators can detect pee, and jaywalking might land you in jail.
Top 2024 Fall Destinations Abroad: Where to Experience the Best of Autumn Around the world in autumn!
2025 Filipino Travel Trends: What’s Hot This Year? What does 2025 in store for Filipino travellers?
Latest Articles
SM North-Trinoma Walkway Soon to Be Built, Says DOTr Safer walks ahead!
Pangasinan Town Now Accepts Digital Payments in Markets and Transport No cash? No problem. Alcala, Pangasinan is officially in its digital era.
Pop Mart PH Opens Permanent Flagship Store in SM Megamall Labubu and Hirono have arrived! Check out holiday hours and event recaps here!
Chen of EXO Arcadia Concert Manila 2026: Tickets, Dates, and Perks Ticket info and fan perks
TLC Playpark: Free Christmas Destination in Taguig, Opening Hours, and Commute Guide Learn what to expect and how to get to TLC Playpark in Brgy. Lower Bicutan Taguig via C5 and MRT-3!

